Fixing Stucco Cracks and what are my options now.
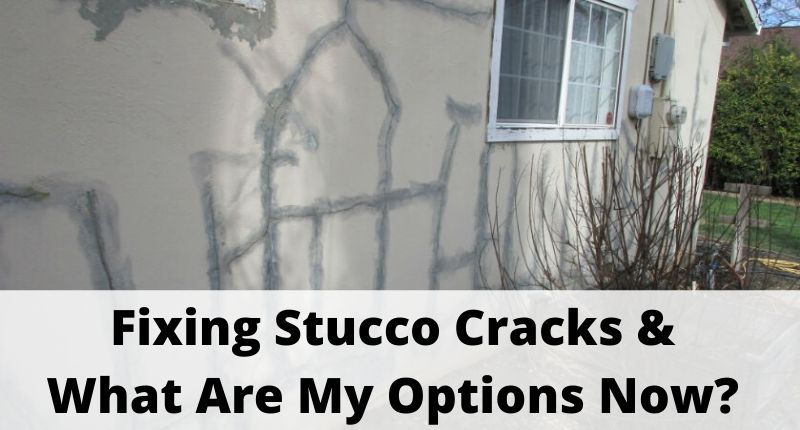
Stucco houses crack, that’s a fact because of the rigid nature of the material used and movement in one way or another. Addressing those cracks also becomes a question that I get quite often and I thought it was time to write about the topic so you know what the main options are.
How Do I Fix Stucco Cracks?
There are really three main ways to fix stucco cracking and that would be to 1) apply caulking into the crack, 2) mesh over the cracks and try to blend in some finish coat material or 3) to have the entire wall recoated with a new finish coat.
These will vary in price though and from the order I stated above will usually increase in price as the job entails more work and larger amounts of material. I will give a real life example of what you could possibly see (pricewise) for the three different methods for remedying stucco cracks on a wall.
For example, lets say you had a 10’x20′ wall and it had a half dozen cracks in it and you got a quote for repairing the cracks using caulking for $200, a separate quote for $400 to mesh the cracks and try to blend them in with a bit of finish material and a third quote for $800 to recoat the entire wall.
The example above shows what you might pay for each phase due to the amount of work involved and the materials that are going to be used. Keep in mind that the example is just that, “an example” and prices will differ for repair work due to texture, finish material, the extent of cracking, etc.
Comparing The Three Crack Repair Remedies:
I touched briefly on how cost could be affected by each of the three crack repair methods but now I want to dive into some of the advantages and disadvantages of some of the methods.
Caulking The Cracks: Caulking the cracks in stucco is obviously going to be the cheapest route to go as far as crack repair goes especially if you do it yourself. The cracks can also blend in pretty well if done correctly with the right caulking and the right techniques. You will usually have to paint the wall afterward for the best results.
The downsides to caulking the cracks is usually longevity. Some cracks I have done have lasted 10 years or more and blended great while others have reappeared in a years time. This is just one of those gambles you are taking going this route.
Meshing & Blending The Cracks: Meshing the cracks and adding a little more base coat material or mesh, a light base coat and then a finish coat usually stops the cracks from reappearing again because you are reinforcing that area and adding more material.
The downsides are that blending in the finish can be extremely difficult and the crack areas may be visible afterwards due to the slight difference in texture. The other aspect of this method that is hard to get right is the color match of the existing finish.
Painting or applying a recoat to the wall(s) afterwards is recommended after these types of repairs to blend them in better.
Recoating The Wall(s): Recoating walls that have cracks in them is the best possible way to make the finish and color match nearly identical while keeping most of the cracks from reappearing.
You may have to address the cracks before spreading the wall, using mesh over the cracks, embedding a thin base coat and then recoating the wall(s) if you want to have the best chances of eliminating the existing cracks.
Of course, this is the most labor intense method and will require a lot more materials as well so it will be the most expensive option in most cases but will have the best results overall.
You could even apply mesh on the entire wall, embed a thin base coat and then recoat the wall or walls to better your chances of eliminating any more cracks from forming in the future and getting rid of the existing ones all in one shot. This would be the super premium option though and would cost the most.
How Many Cracks Do You Have?
You need to take into account how many cracks you have in total, on every wall you want repaired and see what makes more sense. Would tackling every crack individually make sense or are there so many that tackling every one individually would take an insane amount of time.
If you have a wall or several walls around your home that have just a few cracks here and there, then tackling those cracks individually would be a good option and would probably be the best course of action.
If your walls have a lot of cracks though, you might want to start considering a recoat because the amount of time it would take to fix all of the cracks individually could take longer and end up costing you more than the recoat would.
What To Expect From Stucco Crack Repair…
I have outlined the three main methods to tackling cracking issues in your stucco and I wanted to add what to expect afterwards. After a crack forms, there will be constant movement in those areas. If you go out in the morning on a hot day and look at a stucco wall that has cracks in it and come back later that day, you might notice that there are fewer cracks than there was before.
This is because the heat expanded the stucco, sealing up the crack and is a visual indicator that there is movement happening (expansion and contraction).
In my experience, I have seen most cracks go away after using one of the three methods outlined above and never returning. However, no material out there will stop all cracking from happening and you should expect a repair rate of about 70-80% on average, not 100%.
Meshing an entire wall and applying a recoat on an older, settled home will yield the best crack repair results with a possibility of the cracks never returning but can be quite expensive and is not always the practical solution for everyone.

