Instructions for Drywall installation guide
Drywall, often called sheetrock, stone, or wallboard installation is a critical step in the construction of a home. The drywall has made it faster and easier than ever before to lay down a solid foundation for painting or applying wallpaper. Now, depending on the size of the space, you may simply build your drywall in a few hours. Let’s see the Drywall installation guide in detail.
Part 1:
Drywall installation guide for Making a Choice
1: Recognize that drywall is often sold in sheets measuring 4’x8′. Professionals including a few more hands often utilize larger 4’x12′ sheets, which are available in larger sizes but need more labor. Even though bigger sheets are more likely to break while being transported to the project site, they are also easier to work with since there are fewer joints that need tape on larger sheets.
In most cases, drywall is laid horizontally, although it may also be placed vertically if needed.
2: Educate yourself on the various thicknesses available, ranging from 1/4 “- 5/8″, with the most common size being 1/2”. These “Sheets” are often used to cover outdated drywall. However, they are not designed to be used in new construction. The building code of your city should be consulted for more particular information.
3: Pay close attention to the drywall’s composition. Use drywall compositions that are appropriate for the space in which it will be placed when making your selection. For example, in high moisture places like garages and bathrooms, there are a variety of moisture-resistant materials referred to as “green rock” that are developed for installation. Before making a purchase, be sure to check with your local hardware or construction supply shop.
As long as it’s not used to line the tub or shower, green rock the whole home may be excessive but might be effective in high humidity areas like bathrooms. When it’s likely to rain, avoid using green rock drywall. Instead of using drywall around the showering or bath tiles, use a gypsum board reinforced with cementitious materials.
Part 2:
Drywall installation guide for Inspection Site
1: Prepare the wall for drywall. Exposed nails, screws, and other obstructions prohibit the new drywall from resting level on the framing.
2: Find and fix hidden harm. Verify that loose blockage, moisture, termites, or other issues won’t hinder setup. Expect steel studs rather than wood. Steel studs are ideal because they are strong, termite-proof, and fire-resistant. The only change is that you must use drywall connectors instead of fingernails when utilizing steel studs.
3: Inspect any insulation that is fastened to the studs for any looseness. Using Kraft tape to fix paper backing rips can help you save money and energy.
4: Apply triple-expanding foam to external wall cracks and gaps. A permanent, non-shrinking and waterproof/water resistant foam should be sought. In or around windows and doors, do not use foam sealant.
Part 3:
Drywall installation guide for Ceiling
1: Measuring and Cutting. Measure your drywall from a corner such that its end rests on a piece of strapping or joist. End pieces of drywall should never be left unsupported. Screwing the drywall to a joist or strapping piece is always recommended.
- You may attempt this if your drywall doesn’t really terminate on a joist or strapping piece:
- Transpose of the measurement from the drywall to the drywall’s center at the farthest support piece.
- Using a T-square, run a razor down the straight line established by the T-square in your drywall.
- Remove the last piece from the scoreline.
- Verify that the drywall’s end is centered on the strapping component or joist before installing it.
2: When installing drywall, squirt adhesive on the underside of each piece of wood. Before you begin to hang the drywall, do this.
3: Using a corner as your starting point, lift the drywall panel onto the ceiling. Ideally, the edges should be parallel to the bracing or joists and pressed firmly against the wall.
4: Five screws should be driven into a single joist or strapping across the center of the sheet of drywall. This procedure should be repeated for each strapping and joist that is buried under the wall.
- Keep the screws equally spaced on the strap or joist.
- When driving screws, leave a 12-inch buffer state on the edges. Avoid screwing too near to the drywall’s edge.
- A drywall gun can make screwing down the drywall a lot simpler.
- In order to avoid tearing or damaging the drywall, be sure to only press the screw heads a few millimeters into the surface.
5: To finish the first row, glue, hoist, and screw-down another row of drywall in the same way. Make sure the finish joints of drywall are at least 3 – 4 feet apart from the prior row’s end joints before beginning the following row (1.2 m).
part 4:
Drywall installation guide for Measuring and Cutting
1: Using a stud finder, mark the locations of all studs. Don’t rely on the fact that all of your studs will be spaced at 16″ or 24″ apart. The builder’s shoddy carpentry might cause some studs to be 1/2″ off either in direction. Using masking tape and a high-visibility marker, draw the centerline of each stud on the floor while the studs are still visible.
2: The final piece of the wall should fit in the middle of the studs if it is measured against a sheet of drywall. Once again, it’s probable that you’ll need to cut some drywall to get the end pieces to sit flush with one another on the wall.
A T-square and a razor knife may be used to draw a line just on drywall paper before cutting. While simultaneously pulling and pushing your leg outward, you’ll be cutting through the drywall in one smooth motion, creating a clean, straight line. Use a razor to remove any residual paper from the freshly created crease.
3: Apply a thin layer of adhesive to the strapping or joists that will be covered by the drywall. Before you begin to hang the drywall, do this.
4: Install five nails in the stud in the middle of each panel of drywall using a drill with the aid of a friend. Work your way out from the center. To secure each stud, put in five-screw each.
- A few more screws might be useful in certain cases but they are typically overkilled and need additional mudding and sanding, which can detract from the final surface.
- It’s possible to use spring-loaded screws to make holes in the wall. Designed to countersink every drywall screw to the same depth when ratcheting its screw bit as a signal to stop and turn off the drill.
5: To cut around arches and other unusual openings, are using a drywall saw and achieve a clean cut. Drapery should be installed over all of the windows and doors. Afterward, you’ll be capable of removing any extra drywall. Be certain that no seam lines up with a doors and windows corner, and therefore do not yet glue panels to the frame surrounding apertures.
Placing the piece of drywall against the pipe and softly tapping the back with a flat piece of wood is a recommended method for covering protruding pipes. To create an exact hole along the dimple, you’ll first need to remove some of the drywall. This should be a lot simpler to complete than a massive hole that takes three or four applications of mud.
6: A row of the roof will be covered when the drywall is glued, lifted, and screwed in place. When you’re done with one row, start a new row just next to where you ended.
7: It is necessary to remove any drywall which has been hung over any window or door frame. Use rotary drilling or a drywall saw to cut away the required portion of drywall after fastening it around the door or window.
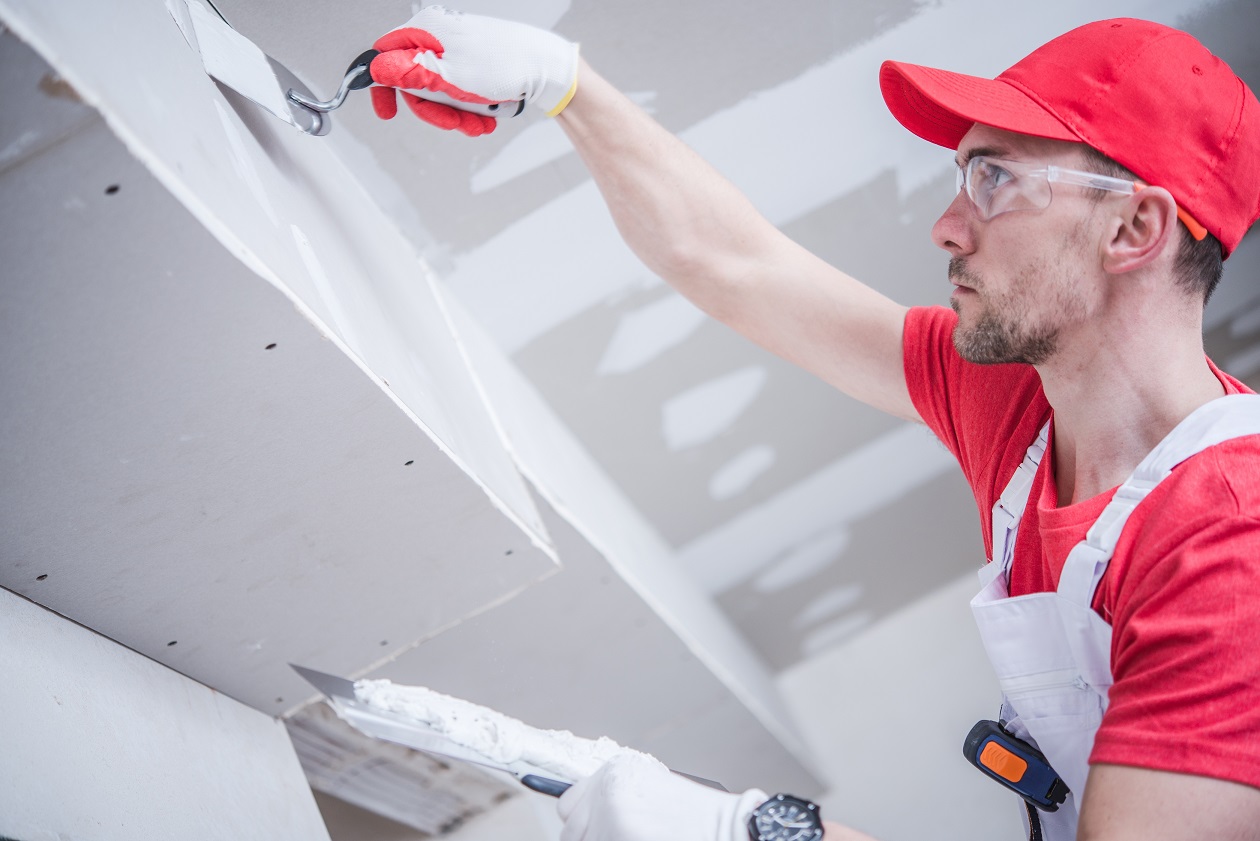
Part 5:
Drywall Mud and Tape
1: Put on a sour cream-thick layer of drywall compound for the first time. If you make your initial application of mud runnier than typical so that it can adhere to and seal the seam, you’ll get a better seal.
2: Apply a generous quantity of muck to a seam using a drywall knife. You will not have to risk getting it right the first time around; when you apply the tape, you’ll wash off the excess. Make certain that the seam is completely hidden.
3: To finish the job, apply drywall tape to all of the areas where you’ve put mud. Start at one end of the tape and pull it towards you in one continuous motion with a 6″ – 8″ drywall putty knife.
4: Use a drywall knife to remove the excess mud from around the tape. Remove any extra mud from the seam to ensure a level and smooth surface.
5: Make sure there are no air bubbles in your newly taped joints. If you need to flatten out your blade, wet it and do it again.
6: Consider utilizing a corner beading tool that can be used for both the inside and the outside of the corner. Your work will have a polished appearance if you do this.
7: Use a slightly larger putty knife for every application to apply at least 2 – 3 extra coats. Between coats, let the mud dry. Rushing it can cause it to boil up!
Part 6:
Sanding and finalizing the project Obtain the Article
1: Make sure the last layer of paint has dried before you go back in and smooth off any rough spots with sandpaper. Make sure that you don’t go carried away and scrape until the paper is exposed. Because the mud is readily sanded off, this stage goes rather fast.
2: It’s time to get down to the business of sanding the rest of the wall. Again, care is the essential word here. Quickly scrubbing the joints will suffice.
3: Examine any compounded surface for faults using a flashlight and a pencil. You’ll be able to see any flaws in the light.
4: The walls should be primed and sanded again. After applying the primer, gently sand the whole surface using pole sanding. For a good, even finish and to eliminate fuzzy paper residues and fluff carried over after the first polishing, this is an important step that most novices overlook.
5: Don’t sand too much. When sanding, some individuals go beyond and sand through the tape, which is a waste of time and effort. Re-sand the area when it’s dry and add some more mud.
FAQs:
What is the building code for Drywall installation?
As stated by the International Building Code (IRC) and by USG, the producer of Sheetrock, the similar fields screw spacing is 16 inches. Builders may go lower to 12 inches to position fasteners more tightly.
Do you know which side of the drywall is facing the outside world?
Function. Because of this, it’s best to avoid putting up drywall with the brown side up. A grey, green or blue side (depending on the kind) should face outward. If the drywall is oriented incorrectly, the painted surface will seem rough and unfinished.