The plumbing & piping idiosyncrasies have been taken into consideration while drawing up a construction plan or building blueprint. The layout and connectivity of pipes must be planned the placement of plumbing equipment, and so on, must be planned out.
Even with well-thought-out plumbing and pipe design, you may have to make adjustments as you go along. ConceptDraw’s Plumbing & Piping Plan solution allows you to build plumbing & piping plans. That employ authentic plumbing symbols, such as pipes and pipes.
/Bathroom-plumbing-pipes-GettyImages-172205337-5880e41e3df78c2ccd95e977.jpg)
Making a thorough Plumbing & Piping Plan it’ll save both time and money in the long run. In addition, designing the Plumbing & Piping plan lets you think thru the project in more depth. Which may lead to the discovery of items that may have been overlooked. At the very least, it will save you time and money by reducing the number of trips to a plumbing supply store. A well-presented Plumbing and Pipe Plan can also help you communicate more effectively with a construction contractor.
How we can Design Plumbing Layout for a Residential Area?
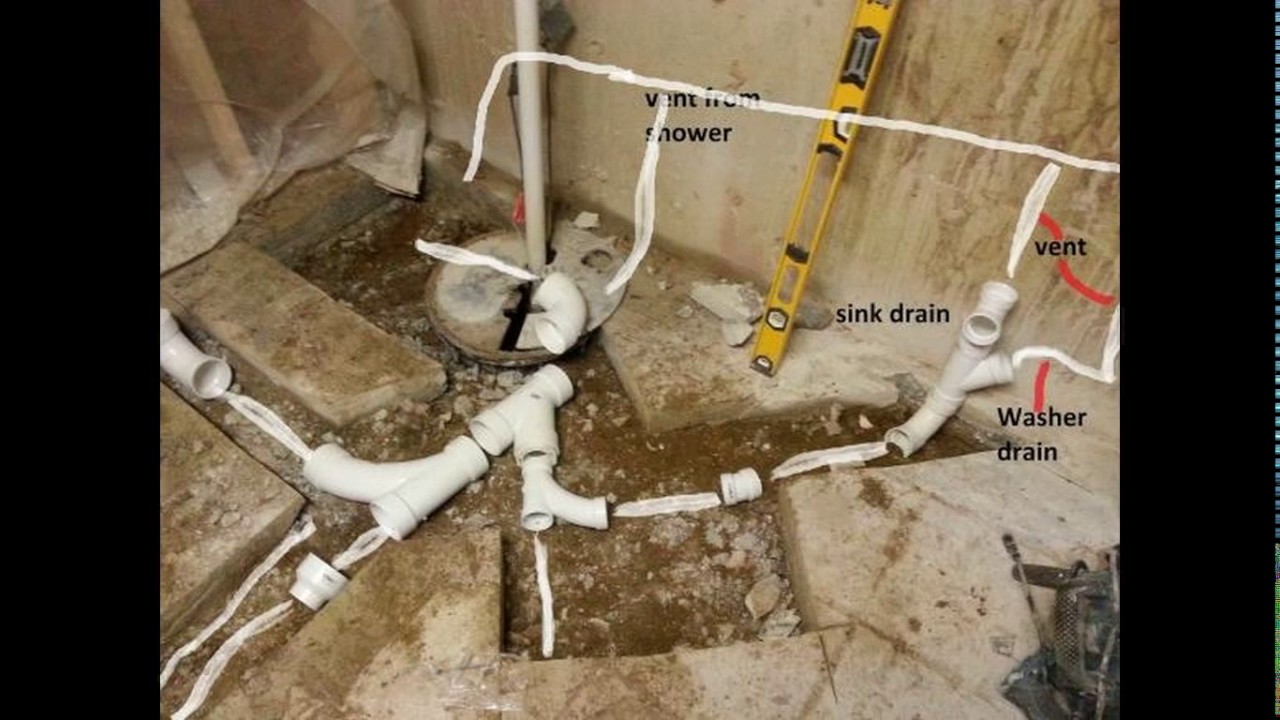
As you can see in this plumbing diagram, the house’s plumbing system includes a cold and hot water supply and a waste disposal system.
How we can design Plumbing Layout? Actually, it is a sort of technical design that displays the pipe system for both fresh water and waste, both liquid and solid.
It was developed using ConceptDraw PRO, a diagramming & vector drawing program. Using the Plumbing using Pipe Plans solution from of the Building plans part of ConceptDraw Solutions Park. For these reasons, we can design Plumbing Layout.
Putting up a Water and Sewer System
Preliminary measurements for all of the fixtures in your plumbing system must be taken before any work can begin on their installation.
It’s important to know the sizes of the fixtures, as well as their minimum height and distance from floor and wall. And the position of holes in both the wall and floor for waste pipes in these roughing designs (plumbing rough-in plans). Your dealer may provide these dimensions when you buy the fixtures.
Make holes on the floor of bathrooms and kitchens so that sewage lines can be put in.
On InspectApedia.com, an online resource for building and environmental inspections, testing, diagnostics, repair, and issue avoidance. You’ll find a section on how to “Build Your Dream Home.”
On InspectApedia.com, an online resource for building and environmental inspections, testing, diagnostics, repair, and issue avoidance. You’ll find a section on how to “Build Your Dream Home.”
To create holes, use a brace and bit to drill through the flooring. And then a keyhole saw to widen the entrance. Make sure that the holes are not exactly above a floor joist when you drill them. In fact, the joists & studying must be spared as much as possible while installing the water heater equipment.
This element should be strengthened by nailing metal straps across the aperture. Moreover, by cutting the joists or studs back to allow for the passage of the pipe to be installed.
The soil-pipe stack will need floor openings in addition to holes for the waste pipes from the fixtures. Because the hub on the dirt pipe is larger than the standard 2″ x 4″ studding. The side of the toilet was boxed with 2″ x 6″ rather than 2″ x 4″.
Inevitably, the placement of the street line or septic tank in respect to the house will decide where the sewer soil pipe enters the home. The rear of the house is the preferred entry point since it requires the least amount of soil pipe in this design.
Other factors that will have an impact on how the plumbing is set out include your home’s foundation type.
Shows how each of the three kinds of homes mentioned in this textbook, the house with and without a basement, as well as the house with a slab of concrete poured on top, can help make things more clear.
Plumbers that specialize in basement plumbing design and installation.
There should be a 1/4-inch-per-foot slope to the exterior of the house for the soil pipe’s entry to the home. This slope or pitch should never go below 1/8″ per foot. In order to avoid an expensive sewage backlog and spill inside the building, make sure that your plumbing drains have at least 1/8″ of fall for every horizontal foot of flow.
Recesses should be constructed in the bottom of the pit for the soil tube to accommodate the hubs. Rather than relying just on the pipes’ hubs, they should be supported by solid ground over their entire length.
Prior to pouring the concrete, all waste lines that will run through the floor of the home must be installed. For these reasons, we can design Plumbing Layout
There is no need to stop the horizontal dirt pipe now that it has reached the basement drain point. However, if it is completely essential, it should not be implemented. It is preferable to have a basement drain discharge into a dry well instead of the sewage system. A deep-seal trap should be installed in the drain if it is to be discharged into the sewage line.
[content-egg module=GoogleImages]
There is a Y branch on the first vertical section of the soil pipe coinciding with the first sanitary tee This has a brass spotless plug on one side so that if the sewage line becomes blocked, there would be an easy way to access it. The end of the sewage tee branch may be blocked if you don’t plan on installing a basement floor drain.
Vent Flashing for Soil Pipes on the Roof
The vertical stack may be re-ascended until it reaches the location where the branch will be installed to handle the drains in the toilet, bathtub, and sink. This branch has a 2 on top of a double-topped T “It’s like a tap. There is a 4-by-2-inch sanitary tee in the following segment.
Up until they reach the top of the soil stack, which is comprised of a 4 “The vent line from of the fixtures has a tapped sanitary tee attached. This tee’s final resting place will be determined by your future ideas for the attic.
If you want to add a bathroom in the future, you’ll have a double sanitation tee at the bathtub floor level to accommodate the extra fixtures. The tee’s apertures should be covered until it is prepared for use. For these reasons, we can design Plumbing Layout
If you live in a cold region, you’ll need to take extra precautions to keep frost from accumulating in the soil pipe above the roof. An increaser may be used to enlarge the diameter of the pipe. When expanding, make sure that the new size is at least 12 degrees shorter than the roof.
To avoid leaks, the gap between both the roof and indeed the soil line must be properly flashed. There are a variety of ways to flash, as seen in Fig. 3.5. An adequate amount of flashing is required above the ground pipe. Copper or lead should be used for flashing.
Building a Drainage System Without a Basement
With no basement, the most important aspect when establishing a drainage system is making sure there is enough headroom for all of the different fittings to be placed.
A clean-out may be finished by the end of such sanitation base tee there will no requirement for a floor drain. Metal hangers should be fitted to the floorboards at least 10 feet to support the horizontal lines of the soil pipe.
Concrete-Slab House Plumbing-Drain Design
[content-egg module=Youtube]
Pipes and connections below the floor must be installed before the concrete is poured in a poured concrete-slab home. The apertures at the top should be filled with something that will prevent cement or other debris from entering the line.
The pipelines must be firmly secured in place so the freshly poured concrete will not dislodge them. Concrete should not be used to surround the pipes. Before the foundation is laid, put on some loose-fitting metal sleeves to protect them. For these reasons, we can design Plumbing Layout
Concrete-encased pipes and fittings must be very robust since they will be almost hard to repair. Copper, brass, and lead are all acceptable materials.
Drainage and Sewage Systems
Compared to a drainage system, constructing a freshwater infrastructure is a breeze.
For homes with the first floor and concrete slab floors, these lines are laid out in a similar manner. It’s unlikely that the lines between homes with and without basements will vary much.
Only if the hot water heater is located in the basement, rather than the utility room, would this be an exemption. Depending on the kind of heating system in use, the boiler may be outfitted to provide residential hot water.
In order to prevent the pipes from freezing in the case of a power outage. Both the cold water lines have been given a minor pitch. The lower part of each system is supplied with a plug. Insulating the hot-water pipes may save a significant amount of energy.
Coldwater should be sent to the user’s left when installing the supply line. For a bathroom toilet, and hot water to the user’s right.
Support for all lines should be provided in accordance with the guidelines outlined earlier in the chapter. When water under power travels through unsecured pipes, the joints will eventually open up and spill.
The tub may be installed as soon even as plumbing lines have been completed.
All walls must be finished before installing the bathroom, kitchen sink, and water closet. There should be a 30-inch gap between your toilet and the rest of the floor.
FAQs:
What do I need to know about plumbing?
This is a picture of how to draw a plumbing diagram.
The first step in drawing a plumbing design is to ensure that the fittings are not too tight enough. The drain pipes and vent for the fixtures should be marked, and the supply lines should be added at this stage. Also, include vertical pipe runs in your riser designs.
How much of the plumbing work can I do myself?
Licensed plumbers are necessary if you comprehend your new construction’s plumbing system. Don’t try to do a plumbing rough-in on your own.